There are certain desserts that instantly make you pause and savor the moment. For me, crème brûlée has always been one of those special treats. The crack of the caramelized sugar topping, followed by that rich, creamy custard underneath, feels like pure indulgence. The only problem is that traditional crème brûlée can be a bit time-consuming when you’re short on time or baking for a crowd.
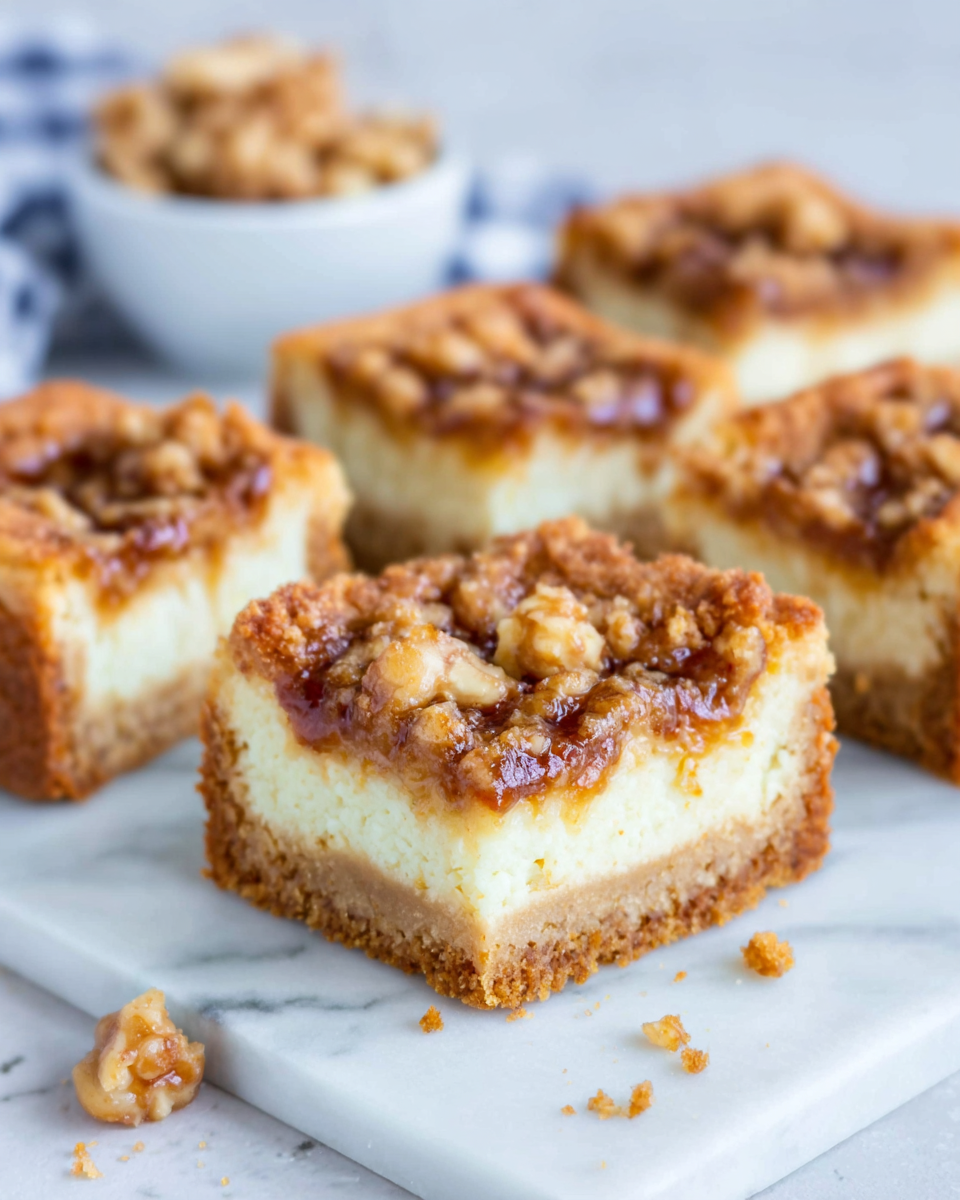
That’s exactly why I love these Crème Brûlée Cookie Bars. They capture the same comforting vanilla flavor and caramelized sweetness of the classic French dessert, but in a simple cookie bar form that’s easy to make and even easier to share. They have a soft, chewy texture, a rich white chocolate base, and a buttery toffee topping that creates the perfect crème brûlée-inspired finish.
Whether you’re baking for a family gathering, a holiday dessert table, or simply because you’re craving something sweet, these bars deliver all the flavor without the fuss.
Overview of Recipe
Crème Brûlée Cookie Bars are a delicious dessert bar inspired by the flavors of classic crème brûlée. Instead of individual custards and caramelized sugar tops, this recipe transforms those beloved flavors into a soft and chewy cookie bar.
The white chocolate creates a creamy richness that pairs beautifully with vanilla, while the toffee bits add a caramel-like crunch reminiscent of the traditional brûléed topping. Every bite is sweet, buttery, and incredibly satisfying.
You’ll love this recipe because it’s:
- Quick to prepare
- Made with simple pantry ingredients
- Perfect for sharing
- Great for parties and potlucks
- Easy to store and freeze
- Beginner-friendly
The aroma while baking is warm and buttery with notes of vanilla and caramel. Once cooled, the bars develop a chewy texture that melts in your mouth while still offering a delightful crunch from the topping.
Ingredients
You’ll need the following ingredients to make these Crème Brûlée Cookie Bars:
- ½ cup (113g) unsalted butter
- 12 ounces (340g) white chocolate chips, about 2 cups
- 1¼ cups (155g) all-purpose flour
- ¾ cup (149g) granulated sugar
- 1 tablespoon pure vanilla extract
- ¼ teaspoon salt
- 3 large eggs, room temperature
- 1 cup toffee bits
Necessary Tools for Preparation
Having everything ready before you start makes the process smooth and enjoyable.
You’ll need:
- 9×13-inch baking pan
- Parchment paper
- Medium saucepan
- Large mixing bowl
- Whisk
- Silicone spatula
- Measuring cups and spoons
- Cooling rack
- Sharp knife for slicing
If you’d like to create a more authentic crème brûlée effect, you can also use a kitchen torch after baking, although it’s completely optional.
Ingredient Additions and Substitutions
This recipe is wonderfully flexible, so feel free to make it your own.
Chocolate Options
- Substitute milk chocolate chips for a sweeter flavor.
- Use dark chocolate chips for a richer taste.
- Try vanilla baking chips for a lighter flavor profile.
Flour Alternatives
- Use a gluten-free 1:1 baking flour blend.
- Replace part of the flour with white whole wheat flour for extra depth.
Flavor Enhancers
- Add 1 teaspoon instant espresso powder.
- Stir in 1 teaspoon orange zest.
- Add a pinch of cinnamon.
- Include a small pinch of nutmeg.
Extra Crunch
- Chopped pecans
- Chopped walnuts
- Sliced almonds
- Additional toffee bits
Authentic Crème Brûlée Finish
- Sprinkle a thin layer of granulated sugar over the cooled bars.
- Use a kitchen torch to caramelize the sugar until golden and crisp.
How to Make Crème Brûlée Cookie Bars
Step 1: Prepare the Baking Pan
Preheat your oven to 350°F (175°C).
Line a 9×13-inch baking pan with parchment paper, allowing some overhang on the sides. This makes removing the bars much easier once they’ve cooled.
Step 2: Melt the Butter and White Chocolate
Place the unsalted butter and white chocolate chips in a medium saucepan.
Heat over low heat, stirring constantly until the mixture becomes completely smooth and glossy.
Take your time during this step. White chocolate can burn quickly if exposed to high heat.
Once melted, remove the saucepan from the heat.
Step 3: Create the Flavor Base
Transfer the warm white chocolate mixture to a large mixing bowl.
Add the granulated sugar, vanilla extract, and salt.
Whisk thoroughly until everything is fully combined. The sugar will begin dissolving into the warm mixture, creating a silky batter base.
Step 4: Add the Eggs
Crack in one egg at a time.
Whisk well after each addition before adding the next egg.
This gradual process helps create a smooth batter and contributes to the rich, chewy texture of the finished bars.
Step 5: Incorporate the Flour
Add the all-purpose flour.
Using a spatula, gently fold the flour into the batter until no dry streaks remain.
Avoid overmixing. Once the flour disappears, stop mixing. This keeps the bars soft and tender.
Step 6: Spread the Batter
Pour the batter into your prepared baking pan.
Use a spatula to spread it evenly into all corners.
An even layer ensures consistent baking throughout the pan.
Step 7: Bake the Cookie Bars
Place the pan in the preheated oven.
Bake for about 25 minutes.
The edges should begin turning lightly golden while the center appears mostly set.
Step 8: Add the Toffee Topping
Carefully remove the pan from the oven.
Sprinkle the toffee bits evenly over the entire surface of the bars.
Try to distribute them as evenly as possible so every bite gets that signature caramel crunch.
Step 9: Finish Baking
Return the pan to the oven.
Bake for an additional 5 to 10 minutes.
The edges should be golden brown and the center should look fully set.
The toffee bits will soften slightly and create a beautiful caramelized topping.
Step 10: Cool Completely
Place the pan on a cooling rack.
Allow the bars to cool completely before slicing.
This step is important because the bars continue setting as they cool. Cutting them too soon may cause them to fall apart.
Step 11: Slice and Serve
Once completely cooled, use the parchment paper overhang to lift the bars out of the pan.
Transfer them to a cutting board and slice into squares.
Serve and enjoy every chewy, caramel-filled bite.
Tips for Making the Best Crème Brûlée Cookie Bars
Use high-quality white chocolate whenever possible. Since white chocolate is one of the primary flavors in this recipe, better-quality chocolate produces noticeably better results.
Allow your eggs to come to room temperature before mixing. Room-temperature eggs blend more easily into the batter and help create a smoother texture.
Watch the baking time carefully. Overbaking can make the bars dry rather than chewy.
If you want a stronger crème brûlée flavor, add a thin layer of sugar on top after baking and lightly caramelize it with a kitchen torch.
Always let the bars cool completely before slicing. This patience pays off with cleaner cuts and a better overall texture.

Storage Instructions
These bars stay fresh surprisingly well.
Store them in an airtight container at room temperature for up to 4 days.
For longer storage, place them in the refrigerator for up to 1 week. Let them sit at room temperature for about 15 minutes before serving for the best texture.
To freeze, wrap individual bars tightly in plastic wrap and place them in a freezer-safe container or freezer bag.
They can be frozen for up to 3 months.
When you’re ready to enjoy them, thaw overnight in the refrigerator or at room temperature for about 30 minutes.
General Information
Crème brûlée is one of France’s most famous desserts. The name translates to “burnt cream,” referring to the caramelized sugar layer that sits on top of a rich vanilla custard.
While traditional crème brûlée requires careful baking and often a water bath, these cookie bars offer a much easier way to enjoy those same flavors.
The combination of white chocolate, vanilla, and toffee creates a dessert that feels elegant while remaining approachable. That’s one reason these bars have become such a favorite for home bakers looking for something unique.
They’re also ideal for gatherings because they can be sliced into individual portions and served without any special preparation.
Frequently Asked Questions
Can I make these cookie bars ahead of time?
Yes. In fact, many people find that the flavor improves after the bars sit overnight. Simply store them in an airtight container until serving.
Can I use dark chocolate instead of white chocolate?
You can. The flavor will be richer and less similar to traditional crème brûlée, but the bars will still be delicious.
Do I need a kitchen torch?
No. The toffee bits provide plenty of caramelized flavor on their own. The torch is simply an optional finishing touch.
Why are my cookie bars dry?
Dry bars usually result from overbaking or overmixing the batter. Be sure to watch the baking time closely and mix only until the flour is incorporated.
Conclusion
These Crème Brûlée Cookie Bars are proof that impressive desserts don’t have to be complicated. They combine creamy vanilla flavor, buttery richness, and caramelized crunch in a dessert that’s simple enough for everyday baking but special enough for celebrations.
If you enjoyed this recipe and want even more delicious inspiration, follow me on Pinterest: https://www.pinterest.com/AngelinaCooking/
Print
Crème Brûlée Cookie Bars
Imagine all that dreamy flavor of a classic crème brûlée packed into an easy-to-make, shareable bar. These Crème Brûlée Cookie Bars are the perfect blend of a chewy cookie and a luxurious custard experience, topped with a crunchy toffee layer that mimics the traditional caramelized sugar crust.
- Total Time: 50 minutes
- Yield: 24 bars 1x
Ingredients
1/2 cup (113g) unsalted butter
12 oz (about 2 cups or 350g) white chocolate chips
1 1/4 cups (155g) all-purpose flour
3/4 cup (149g) granulated sugar
1 tablespoon (15ml) vanilla extract
1/4 teaspoon salt
3 large eggs
1 cup toffee bits
Instructions
1. Preheat your oven to 350°F (175°C). Line a 9×13-inch baking pan with parchment paper, leaving a little overhang on the sides for easy lifting later.
2. In a medium saucepan, gently melt the unsalted butter and white chocolate chips over low heat, stirring continuously until smooth and glossy to prevent scorching.
3. Remove the saucepan from the heat and carefully transfer the melted mixture into a large mixing bowl.
4. Stir in the granulated sugar, vanilla extract, and salt. Whisk until well combined and the sugar starts to dissolve into the warm mixture.
5. Add the eggs one at a time, making sure to mix well and fully incorporate each egg before adding the next.
6. Gently mix in the all-purpose flour until it’s just combined—do not overmix, or the bars can become tough.
7. Pour the batter into the prepared pan and spread it out evenly into all corners with a spatula.
8. Bake in the preheated oven for 25 minutes until the edges just start to turn golden and the center is mostly set but still slightly soft.
9. Remove from the oven and immediately sprinkle the toffee bits evenly over the top of the partially baked bars.
10. Return to the oven and bake for an additional 5 to 10 minutes, keeping a close eye on them until the edges are golden brown and the center is fully set.
11. Allow the bars to cool completely in the pan to let them set properly before lifting out using the parchment overhang and slicing into squares.
Notes
For a deeper “brûlée” flavor: After sprinkling the toffee bits, you can sprinkle a thin layer of granulated sugar over them and use a kitchen torch to caramelize it into a true, glassy top!
Don’t Overbake: Cookie bars can go from perfectly chewy to dry quickly. The center should be set, but not hard.
Cool Completely: Cutting these bars while warm will result in a messy, crumbly experience. They need time to firm up and let the flavors meld.
Using room temperature eggs will help them incorporate more smoothly into the warm chocolate mixture.
Storage: Store in an airtight container at room temperature for 3-4 days, or in the fridge for up to a week. They can also be frozen for up to 3 months.
- Prep Time: 15 minutes
- Cook Time: 35 minutes
- Category: Dessert
- Method: Baking
- Cuisine: American / French-inspired
- Diet: Vegetarian
Nutrition
- Serving Size: 1 bar
- Calories: 210
- Sugar: 19g
- Sodium: 65mg
- Fat: 11g
- Saturated Fat: 7g
- Unsaturated Fat: 4g
- Trans Fat: 0.2g
- Carbohydrates: 25g
- Fiber: 0g
- Protein: 3g
- Cholesterol: 45mg
Keywords: creme brulee cookie bars, white chocolate blondies, toffee bits dessert square, easy custard bars, no torch creme brulee