
There is something special about the excitement of a new school year. Fresh notebooks, sharpened pencils, clean backpacks, and the promise of a brand-new beginning can make even an ordinary afternoon feel memorable. I love recipes that capture that feeling, especially when they turn a simple treat into something that feels like a little celebration.
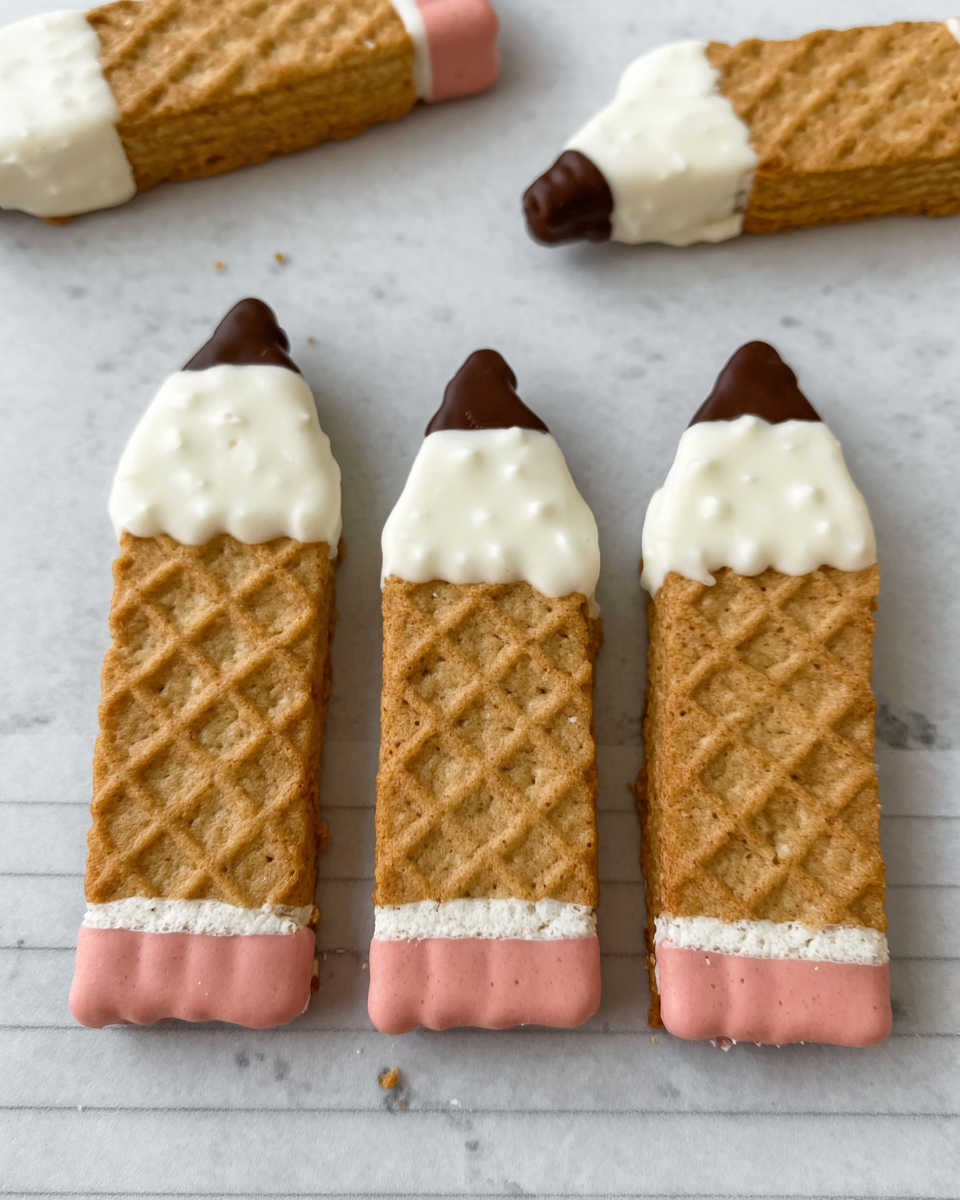
These Back to School Pencil Cookies bring that cheerful spirit straight to the dessert table. Instead of baking traditional cookies from scratch, you transform wafer cookies into adorable edible pencils with white and pink candy melts and chocolate chips. The result looks playful, colorful, and wonderfully nostalgic.
They make a fun treat for a first-day-of-school celebration, a back-to-school party, or a thoughtful teacher gift. Best of all, the decorating process lets you create a batch of pencil-shaped treats without complicated cookie cutters or elaborate decorating equipment.
Overview of Back to School Pencil Cookies
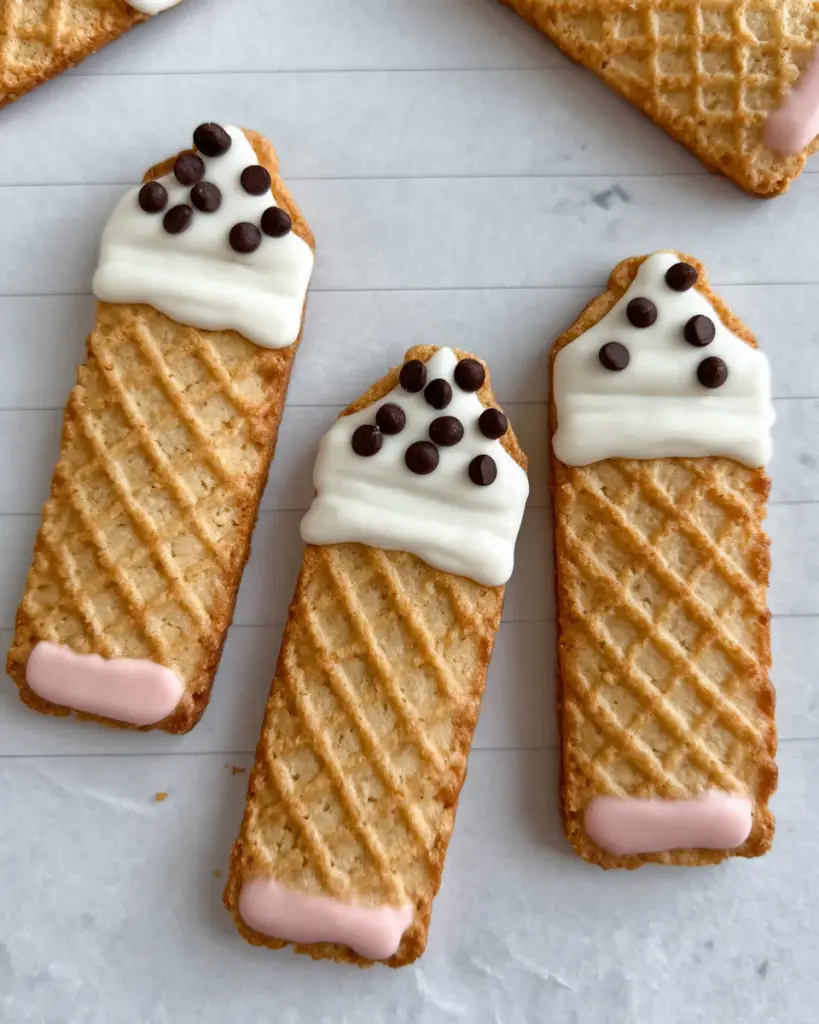
Back to School Pencil Cookies start with crisp wafer cookies that you cut at one end to create the pointed shape of a pencil. White candy melts or almond bark create the pencil tip, while a chocolate chip forms the edible pencil lead. Pink candy melts then create the eraser at the opposite end.
The finished treats combine a light, crisp wafer texture with smooth, sweet candy coating and a little chocolate richness from the chip. Because you work with prepared wafer cookies rather than homemade cookie dough, you can focus your time on shaping and decorating.
These cookies also work beautifully as edible gifts. Individually wrapping the finished pencils keeps them protected, while a simple tag can turn them into a charming teacher appreciation gift.
Ingredients for Back to School Pencil Cookies
You only need four main ingredients to make these fun treats.
Start with 1 package of 24 wafer cookies. The long, narrow shape makes them ideal for creating the appearance of pencils.
Use 1 package of white candy melts or almond bark for the pointed pencil tips. This coating gives the cut end a clean, light appearance.
Add 1 package of pink candy melts for the erasers. The pink color instantly gives the finished treats their classic pencil look.
Finally, use 1 package of chocolate chips. Each chip becomes the pencil lead at the pointed end.
If you plan to give the cookies as gifts, also keep clear gift bags and tags available for packaging.
Necessary Tools for Preparation
You will need a cutting board and paring knife to shape the wafer cookies. Keep a silicone spatula or small straight-edged spatula nearby because it helps smooth the candy coating and tidy the edges.
For melting the candy, use a saucepan and a large heat-safe glass bowl that fits securely over the saucepan. This setup creates a simple double-boiler method. You can also use a traditional double boiler if you have one.
Keep parchment paper ready for the work surface so the decorated cookies can cool and set without sticking.
Ingredient Additions and Substitutions
The original recipe keeps the ingredient list intentionally simple, but you can make a few practical changes depending on what you have available.
- White candy melts: Use almond bark as suggested in the original recipe.
- Pink candy melts: Choose another color if you want to match a school party, classroom theme, or team colors.
- Chocolate chips: Use regular or mini chocolate chips, depending on the size of the wafer cookies and the appearance you want.
- Wafer cookies: Choose long, narrow wafer cookies that allow you to create a recognizable pencil shape.
- Packaging: Replace clear gift bags with small food-safe boxes if you prefer a sturdier gift presentation.
When giving these treats to teachers, classmates, or friends, include the ingredients on the label. That simple step helps recipients identify potential food allergens before enjoying the cookies.
How to Make Back to School Pencil Cookies
Step 1: Prepare a work surface by laying parchment paper on a flat area. Place the wafer cookies on a cutting board and keep your paring knife nearby.
Step 2: Cut one end of each wafer cookie at an angle to create the pointed shape of a pencil. Work carefully because wafer cookies can break if you apply too much pressure.
Step 3: Place the shaped cookies on the parchment paper. Arrange your ingredients and tools nearby so you can decorate each cookie while the melted coating remains workable.
Step 4: Create a simple double boiler by adding a couple of inches of water to a saucepan. Place a large heat-safe glass bowl over the opening, making sure the bowl sits securely without touching the water.
Step 5: Add the white candy melts or almond bark to the bowl. Slowly simmer the water and allow the coating to melt gradually. Keep water and steam away from the candy because moisture can cause melted chocolate or candy coating to seize.
Step 6: Use a paring knife or small straight-edged spatula to spread the melted white coating over the cut end and front sides of each wafer. Shape the coating so it resembles the wooden portion of a pencil around the point.
Step 7: Immediately place one chocolate chip onto the pointed end while the white coating remains soft. Position the chip so the chocolate creates the appearance of pencil lead. If the chip has a loop or uneven detail on top, turn that side toward the back.
Step 8: Use your knife or small spatula to straighten the white coating around the pencil point. Remove excess coating while it remains soft, then leave the cookies on the parchment paper until the white coating sets.
Step 9: Once the white coating has hardened, melt the pink candy melts using the same gentle double-boiler method. Keep the temperature low and melt the candy slowly.
Step 10: Add the melted pink coating to the opposite end of each wafer cookie. Cover the top, end, and sides of the cookie to create the pencil eraser.
Step 11: Smooth the pink coating with a straight-edged spatula or knife. Take a moment to clean up uneven edges before the coating hardens.
Step 12: Allow both ends of the pencil cookies to harden completely. Once set, individually place the cookies into clear gift bags.
Step 13: Add a small tag if you plan to give the treats as teacher gifts. Include the ingredients on the label so recipients can check for potential allergens.
Tips for Making Back to School Pencil Cookies
Work slowly when cutting the wafer cookies. A sharp paring knife gives you better control and helps you create a clean pencil point without crushing the wafer.
Keep a small knife or straight-edged spatula beside you while decorating. Melted candy coating sets as it cools, so smoothing the edges while the coating remains soft gives you a cleaner finish.
The double-boiler method plays an important role in this recipe. Heat the candy melts gradually rather than exposing them to excessive heat. Also, keep water and steam away from the melted coating because moisture can make the mixture seize.
Avoid rushing from the white pencil tip to the pink eraser. Let the white coating set first. Otherwise, the two coatings can smear together and make the pencil shape less defined.
For the neatest presentation, work with one cookie at a time. Add the chocolate chip immediately after coating the point so the chip adheres securely.
If you want more treats for a school gathering, simply scale the ingredient quantities according to the number of wafer cookies you plan to decorate.
Storage Instructions
Store the finished Back to School Pencil Cookies in an airtight container or individually wrapped food-safe bags. Keep them in a cool, dry place away from direct sunlight and heat.
Because the recipe uses candy coating, room-temperature storage generally provides the best texture and appearance. Avoid unnecessary refrigeration because condensation can affect the candy coating.
For gifting, individually wrap each pencil so the decorated cookies do not touch one another. This approach helps protect the candy coating and keeps the treats looking neat.
When preparing the cookies for others, add an ingredient label to the packaging. This practice gives teachers, parents, and other recipients useful information about possible allergens.
General Information About Back to School Pencil Cookies
Pencils have long served as one of the simplest symbols of school, learning, and new beginnings. Turning that familiar classroom object into a dessert gives a traditional back-to-school celebration a playful edible centerpiece.
These treats also demonstrate how creative presentation can transform everyday ingredients. Wafer cookies provide the basic shape, candy coating creates the recognizable pencil details, and a chocolate chip supplies the tiny finishing touch.
The recipe also offers a practical alternative to more elaborate decorated sugar cookies. You do not need to roll dough, cut dozens of shapes, or decorate baked cookies with detailed royal icing. Instead, you shape ready-made wafer cookies and build the pencil design with melted candy.
FAQs
Can I use almond bark instead of white candy melts?
Yes. The original recipe specifically allows white candy melts or almond bark for the pencil tips. Melt the coating slowly using the double-boiler method and keep water and steam away from it.
Why did my melted candy coating become thick or seized?
Moisture can cause melted candy or chocolate coating to seize. Keep water and steam away from the bowl, and avoid heating the coating too aggressively. Gentle, gradual heating gives you better control.
Can I make these pencil cookies ahead of time?
Yes. You can prepare the decorated cookies ahead of a school event or gifting occasion. Once both ends have completely hardened, store them in a cool, dry place and individually wrap them for protection.
How should I package Back to School Pencil Cookies for teachers?
Place each finished pencil in a clear food-safe gift bag and add a simple tag. Include the ingredients on the label so the recipient can check for potential food allergies.
Conclusion
Back to School Pencil Cookies turn a few simple ingredients into a cheerful treat that captures the excitement of a new school year. Crisp wafer cookies become recognizable pencils, white candy coating creates the pointed tips, chocolate chips provide the leads, and pink candy melts finish the playful erasers.
Because you can prepare the cookies without making traditional cookie dough, this recipe keeps the process approachable while still delivering an impressive presentation. They work especially well for classroom celebrations, first-day-of-school treats, and teacher gifts.
If you enjoyed this recipe and want even more delicious inspiration, follow me on Pinterest: https://www.pinterest.com/AngelinaCooking/