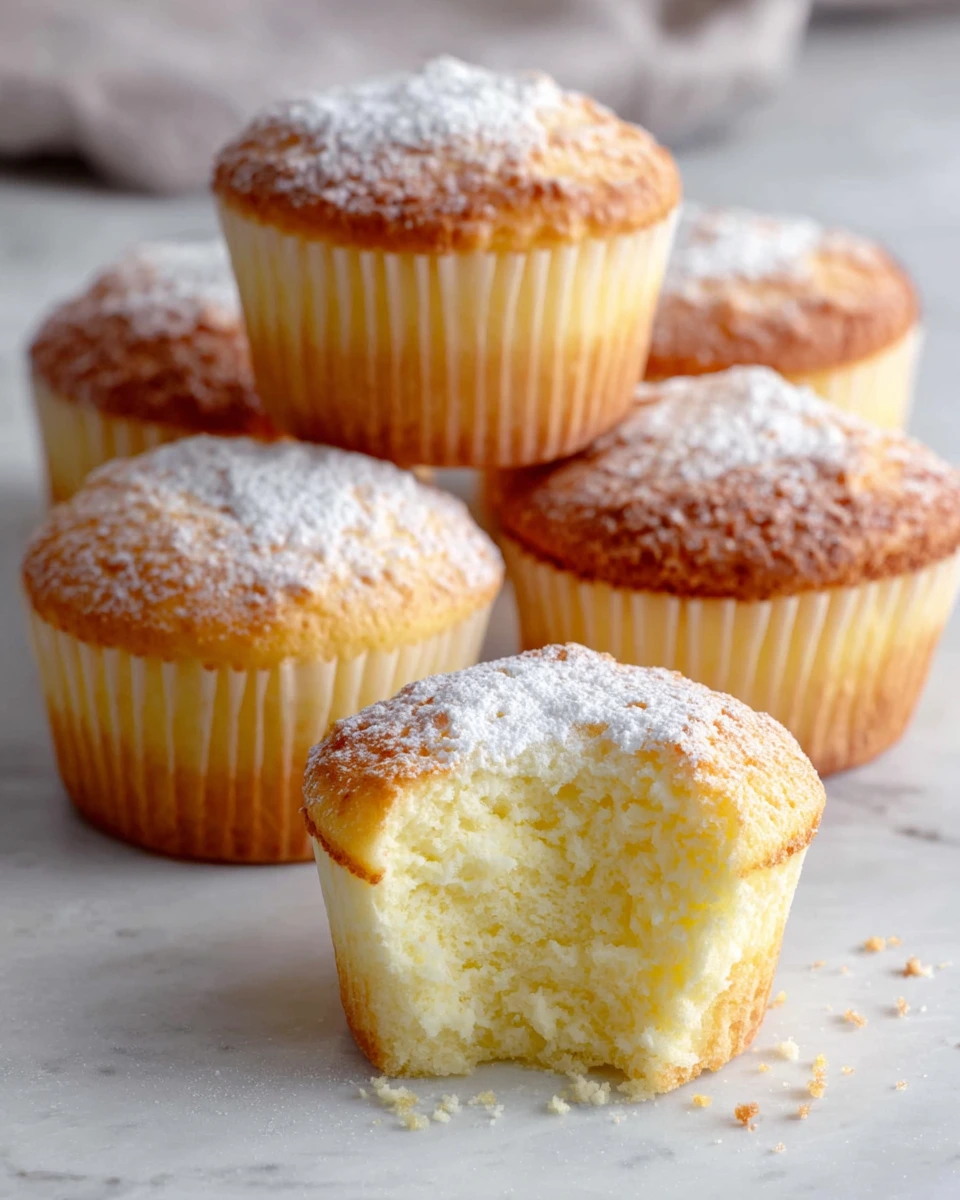
The first time I tasted Japanese cotton cheesecake, I was genuinely surprised by how different it felt from a traditional cheesecake. Instead of being dense and rich, it was incredibly light, soft, and delicate. It almost seemed to disappear the moment it touched my tongue. That experience inspired me to recreate the same texture in an easy-to-serve cupcake form, and these Fluffy Japanese Cotton Cheesecake Cupcakes deliver exactly that.
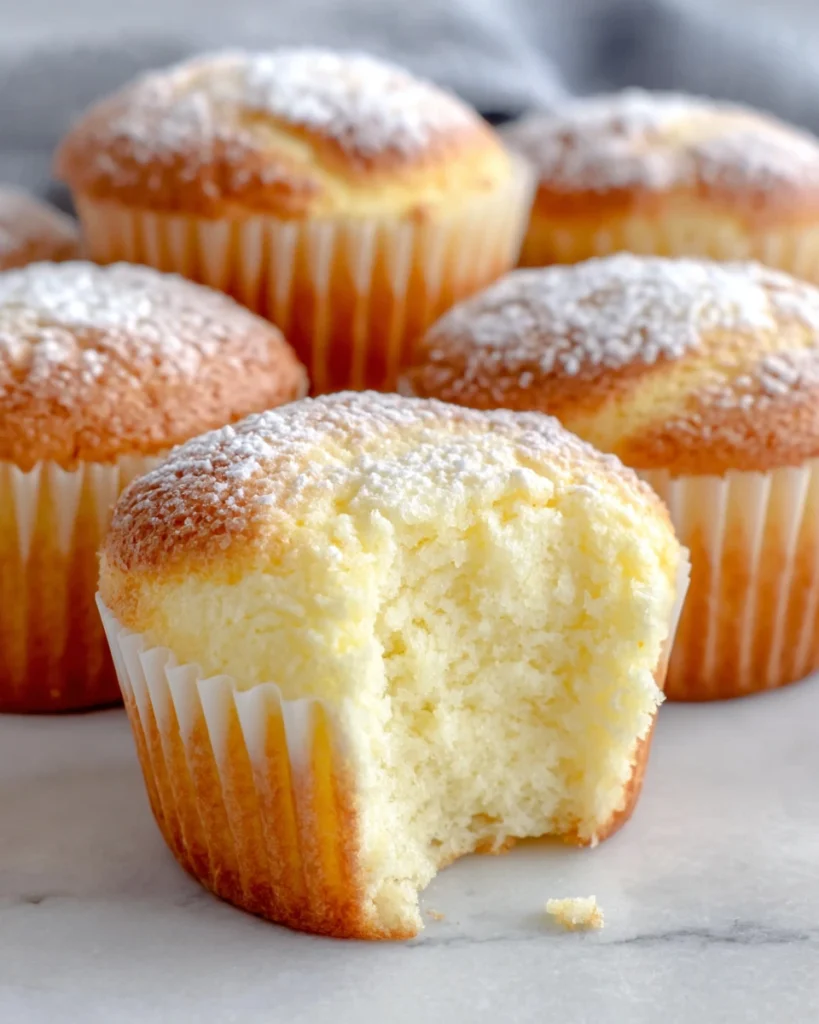
These delightful cupcakes combine the creamy flavor of classic cheesecake with the airy texture of a soufflé. They are elegant enough for celebrations, yet simple enough to enjoy with a cup of coffee on a quiet afternoon. Best of all, each cupcake offers the perfect individual portion, making them ideal for entertaining guests or satisfying a sweet craving without cutting into a full cheesecake.
Overview of Recipe
Fluffy Japanese Cotton Cheesecake Cupcakes are inspired by the famous Japanese cotton cheesecake, a dessert loved for its incredibly light texture and subtle sweetness. Unlike traditional cheesecakes, which tend to be dense and rich, these cupcakes rely on whipped egg whites to create a delicate, cloud-like structure.
The flavor is creamy and slightly tangy from the cream cheese, balanced beautifully with hints of vanilla and fresh lemon juice. The aroma that fills the kitchen while they bake is warm, comforting, and inviting. Once chilled, the cupcakes become silky smooth while maintaining their signature airy texture.
One of the best things about this recipe is its versatility. These cupcakes work beautifully as a make-ahead dessert, store well in the refrigerator, and look impressive despite requiring only basic baking skills.
Ingredients
You’ll need the following ingredients to make these Fluffy Japanese Cotton Cheesecake Cupcakes:
- 8 ounces full-fat cream cheese, softened
- 1/4 cup unsalted butter, softened or gently melted
- 1/2 cup whole milk, at room temperature
- 4 large eggs, separated into yolks and whites
- 1/2 cup granulated sugar
- 1/2 cup cake flour
- 1 tablespoon cornstarch
- 1 teaspoon non-alcohol vanilla extract
- 1 tablespoon fresh lemon juice
Using room-temperature ingredients is especially important for this recipe. They blend more easily, creating a smoother batter and helping achieve the light texture that makes these cupcakes so special.
Necessary Tools for Preparation
To make the process easier and ensure consistent results, gather these tools before you begin:
- Standard 12-cup muffin tin
- 12 paper cupcake liners
- Large baking pan with high sides for the water bath
- Heatproof mixing bowl
- Medium saucepan
- Electric hand mixer or stand mixer
- Whisk
- Rubber spatula
- Fine-mesh sieve
- Measuring cups and spoons
- Cooling rack
Having everything prepared ahead of time helps the baking process flow smoothly, especially when working with meringue.
Ingredient Additions and Substitutions
This recipe is wonderful as written, but you can make a few adjustments depending on your preferences.
- Replace whole milk with lactose-free milk if needed.
- Use a gluten-free cake flour blend for a gluten-free version.
- Substitute fresh lemon juice with yuzu juice for a more authentic Japanese flavor.
- Add 1 teaspoon matcha powder for a subtle green tea variation.
- Mix in a teaspoon of orange zest for a bright citrus note.
- Replace vanilla extract with vanilla bean paste for a richer aroma.
- Top the finished cupcakes with fresh strawberries, raspberries, or blueberries.
- Dust lightly with powdered sugar before serving for an elegant presentation.
Avoid substituting the cream cheese, as it provides the characteristic flavor and structure of the dessert.
Step-by-Step Instructions
Step 1: Prepare the Oven and Water Bath
Preheat your oven to 325°F (160°C). Line a standard 12-cup muffin tin with paper cupcake liners.
Place the muffin tin inside a larger baking pan with high sides. This larger pan will hold the hot water needed for the water bath during baking. The water bath creates a gentle baking environment that helps prevent cracks and keeps the cupcakes moist.
Step 2: Melt the Cream Cheese Mixture
Fill a saucepan with a small amount of water and bring it to a gentle simmer.
Place the softened cream cheese, butter, and milk into a heatproof bowl set over the simmering water. Stir continuously until the ingredients melt together and form a smooth, silky mixture.
Once smooth, remove the bowl from the heat and allow it to cool for several minutes. The mixture should be warm but not hot before adding the eggs.
Step 3: Incorporate the Egg Yolks and Flavorings
Add the egg yolks one at a time, whisking thoroughly after each addition. This gradual process helps create a smooth and stable batter.
Next, whisk in the vanilla extract and fresh lemon juice. The lemon juice adds a subtle brightness that balances the richness of the cream cheese beautifully.
Step 4: Add the Dry Ingredients
Using a fine-mesh sieve, sift the cake flour and cornstarch directly into the cream cheese mixture.
Whisk gently until the batter becomes completely smooth and free of lumps. Avoid overmixing at this stage, as excessive mixing can affect the final texture.
Step 5: Make the Meringue
Place the egg whites into a perfectly clean and dry mixing bowl.
Using an electric mixer, beat the egg whites on medium speed until they become foamy.
Gradually add the granulated sugar, about one tablespoon at a time, while continuing to beat.
Continue mixing until medium-firm peaks form. The meringue should hold its shape while still looking glossy and smooth. Avoid beating until stiff peaks form, as that can make folding more difficult.
Step 6: Fold the Meringue into the Batter
Add about one-third of the meringue to the cream cheese mixture.
Gently fold it in using a spatula. This first addition lightens the batter and makes the remaining meringue easier to incorporate.
Add the remaining meringue in two separate additions. Use slow, sweeping motions from the bottom of the bowl upward.
Continue folding only until no visible streaks remain. The batter should look light, airy, and evenly combined.
Step 7: Fill the Cupcake Liners
Carefully divide the batter among the prepared cupcake liners.
Fill each liner about three-quarters full. This leaves enough room for the cupcakes to rise during baking while maintaining their delicate structure.
Gently tap the muffin tin once or twice on the counter to release any large air bubbles.
Step 8: Set Up the Water Bath and Bake
Place the muffin tin, already sitting inside the larger baking pan, into the preheated oven.
Carefully pour hot water into the larger pan until the water reaches approximately halfway up the sides of the muffin tin.
Bake for 25 to 30 minutes. The tops should develop a light golden color, while the centers remain slightly jiggly when gently shaken.
Step 9: Cool Gradually
Once baking is complete, turn off the oven.
Leave the oven door slightly open and allow the cupcakes to cool slowly inside the oven for 30 to 45 minutes.
This gradual cooling process helps prevent sudden temperature changes that can cause sinking or cracking.
Step 10: Chill Before Serving
Remove the muffin tin from the water bath and transfer the cupcakes to a cooling rack.
Allow them to cool completely at room temperature.
Once cooled, place them in the refrigerator and chill for at least 2 to 3 hours. For the best flavor and texture, refrigerate overnight.
The cupcakes become even creamier and more delicate after chilling.
Tips for Making the Best Fluffy Japanese Cotton Cheesecake Cupcakes
Success with this recipe comes down to a few important details.
Make sure all ingredients are at room temperature before beginning. This creates a smoother batter and promotes even mixing.
Use a clean bowl when whipping egg whites. Even a small amount of grease can prevent the meringue from reaching the proper consistency.
Do not rush the folding process. Gentle folding preserves the air bubbles that create the signature fluffy texture.
Always use a water bath. It provides moisture during baking and helps maintain the delicate structure of the cupcakes.
Avoid opening the oven door while baking. Sudden temperature changes can cause the cupcakes to collapse.
For an extra smooth batter, strain the cream cheese mixture before folding in the meringue.
Storage Instructions
Store leftover cupcakes in an airtight container in the refrigerator for up to 4 days.
Because these cupcakes contain cream cheese and eggs, refrigeration is necessary to maintain freshness and food safety.
For longer storage, wrap each cupcake individually in plastic wrap and place them in a freezer-safe container or freezer bag. They can be frozen for up to 2 months.
When ready to enjoy, thaw them overnight in the refrigerator. They taste best slightly chilled, although allowing them to sit at room temperature for about 10 minutes before serving creates an even creamier texture.
General Information
Japanese cotton cheesecake became popular in Japan during the late twentieth century as bakers experimented with combining Western cheesecake techniques and traditional soufflé methods. The result was a lighter dessert that appealed to those who preferred subtle sweetness and delicate textures.
Today, Japanese cotton cheesecake has become a global favorite. Its signature jiggle, airy structure, and melt-in-your-mouth texture have inspired countless variations, including these charming cupcake-sized versions.
Frequently Asked Questions
Can I make these cupcakes a day in advance?
Yes. In fact, many bakers prefer making them the day before serving. Overnight chilling improves both the flavor and texture.
Why did my cupcakes deflate after baking?
A small amount of settling is normal. Excessive deflation usually occurs from overmixing the batter, overbeating the meringue, or cooling the cupcakes too quickly.
Can I freeze Japanese cotton cheesecake cupcakes?
Yes. Wrap them individually and freeze for up to 2 months. Thaw overnight in the refrigerator before serving.
How do I know when the cupcakes are fully baked?
The tops should be lightly golden, and the centers should still have a slight jiggle when gently shaken. They will continue setting as they cool.
Conclusion
These Fluffy Japanese Cotton Cheesecake Cupcakes offer everything that makes Japanese cotton cheesecake so beloved. They are light yet creamy, delicate yet satisfying, and elegant without being complicated. Whether you’re serving them at a gathering, bringing them to a celebration, or simply treating yourself to something special, these cupcakes never fail to impress.
The combination of silky cream cheese, airy meringue, and gentle baking creates a dessert that truly melts in your mouth. Once you make them, there’s a good chance they’ll become one of your favorite cheesecake recipes.
If you enjoyed this recipe and want even more delicious inspiration, follow me on Pinterest: https://www.pinterest.com/AngelinaCooking/
Print
Fluffy Japanese Cotton Cheesecake Cupcakes
Experience the absolute delight of these Fluffy Japanese Cotton Cheesecake Cupcakes that truly melt in your mouth. Featuring a signature ultra-airy, soufflé-like texture balanced by a rich and creamy vanilla-citrus flavor, these individual portions are the perfect elegant dessert for any gathering.
- Total Time: 1 hour
- Yield: 12 cupcakes 1x
Ingredients
8 oz full-fat cream cheese, softened
1/4 cup unsalted butter, softened or gently melted
1/2 cup whole milk, at room temperature
4 large eggs, separated into yolks and whites
1/2 cup granulated sugar, fine
1/2 cup cake flour
1 tbsp cornstarch
1 tsp non-alcohol vanilla extract
1 tbsp fresh lemon juice
Instructions
1. Preheat your oven to 325°F (160°C). Line a standard 12-cup muffin tin with paper liners. Set up a water bath by placing the muffin tin inside a larger baking pan with high sides.
2. In a heatproof bowl set over a pot of simmering water, combine the softened cream cheese, unsalted butter, and whole milk. Stir gently until completely smooth and melted, then remove from the heat and let the mixture cool slightly.
3. Whisk in the egg yolks one at a time until fully incorporated into the mixture. Add the non-alcohol vanilla extract and fresh lemon juice, whisking until just combined.
4. Sift the cake flour and cornstarch together directly into the cream cheese batter. Whisk very gently until completely smooth, being careful not to overmix the flour.
5. In a separate, perfectly clean and dry bowl, whip the egg whites on medium speed until foamy. Gradually add the fine granulated sugar, one tablespoon at a time, while continuing to whip until medium-firm peaks form.
6. Gently fold about a third of the whipped meringue into the cream cheese batter using a silicone spatula to lighten the base. Then, gently fold in the remaining meringue in two separate additions until just combined, keeping as much air in the batter as possible.
7. Divide the batter evenly among the prepared cupcake liners, filling each about three-quarters full. Place the nested muffin tin into the preheated oven and carefully pour hot water into the larger outer pan until it reaches halfway up the sides of the cupcake pan.
8. Bake for 25 to 30 minutes, or until the tops are beautifully golden brown and the centers are just set with a very slight jiggle.
9. Turn off the oven and prop the door slightly ajar. Allow the delicate cupcakes to cool down gradually inside the water bath for about 30 to 45 minutes to prevent them from deflating.
10. Remove the muffin tin from the water bath and let the cupcakes finish cooling completely on a wire rack. Transfer them to the refrigerator to chill for at least 2 to 3 hours, or preferably overnight, before peeling back the liners and serving.
Notes
Ensure all of your ingredients, especially the cream cheese, eggs, and milk, are completely at room temperature before starting to guarantee a smooth, lump-free batter.
Using a hot water bath is a non-negotiable step for this recipe because it creates the gentle, steamy environment required to keep the cheesecakes perfectly moist and crack-free.
Be incredibly gentle when folding the whipped egg whites into the dense cream cheese base; using an aggressive stirring motion will pop the air bubbles and result in dense cupcakes rather than fluffy ones.
For the absolute best flavor and texture, resist the temptation to eat them warm and let them chill thoroughly overnight in the fridge so the creamy cheesecake flavors can fully develop.
- Prep Time: 30 minutes
- Cook Time: 30 minutes
- Category: Dessert
- Method: Baking
- Cuisine: Japanese
- Diet: Vegetarian
Nutrition
- Serving Size: 1 cupcake
- Calories: 180
- Sugar: 12g
- Sodium: 150mg
- Fat: 10g
- Saturated Fat: 5g
- Unsaturated Fat: 3g
- Trans Fat: 0g
- Carbohydrates: 18g
- Fiber: 0g
- Protein: 4g
- Cholesterol: 70mg
Keywords: japanese cotton cheesecake cupcakes, soufflé cheesecake recipe, fluffy japanese dessert, individual cheesecake portions, light cream cheese cupcakes